|
KeyCreator / Tools / BOM and Table / Create a BOM (If you clicked the Help button on the Virtual Objects dialog box, click here.)
Use this function to create a Bill of Materials (BOM). The BOM is based on data illustrated in the figure below. 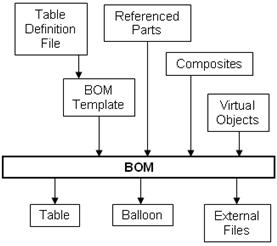
Using the Function:
Dialog Options:Below, are illustrations and descriptions of BOM dialog elements and its panes.
Buttons Common to BOM dialog and panes:Add ButtonClick to add a new empty BOM. The Edit Category Template dialog appears, as shown below. 
Select the desired template (make relative if desired) and click OK. (See step 4 above regarding the Make Relative button). The tree that appears in the BOM dialog at the left is related to the current part. The right side of the BOM dialog contains the fields illustrated below under BOM Dialog Example. Copy ButtonCreate a copy of the selected BOM. The new object is named "Copy of <object name>" Delete ButtonRemove the selected BOM OK ButtonExit the function accepting all the changes. The whole BOM is recalculated, all the external files are rewritten, all tables are updated. Cancel ButtonExit the function cancelling all the changes done during the session Help ButtonOpen the Help system BOM Dialog Example:
Tree on left shows the BOM list related to the current part
NameName of the BOM Disable Balloon Text UpgradeIf selected, the assigned balloon numbers will be considered fixed and will not change in case of item remove or other operation that could change their values. BOM Type(Unavailable until future release) Category DataAllows the subdivision of the BOM items in different groups using a different template for output. The category data defines which is the field representing the category, so that the BOM will be able to sort the items. For some fields, the Parameter field will also appear. For example for a File User Property, the user property name must be indicated as parameter. BalloonIndicates the table column to be used to fill the balloon text Template TableDefines the different ways to fill the table depending on the Category field. Allows you to sort the BOM items based on different categories. Tables are filled following the order of this list. For each category, you can indicate a BOM template file. Select one of the rows in the table and click the Edit Selected button. A dialog then appears asking for data. Note that this assumes all templates are using the same table definition. Print file listWhen clicked, the system generates a report indicating the files used by all of the bill of materials for the current part. The report also indicates any missing files. The following buttons allow you to work on the template table: Add CategoryAdds a row to the table Delete CategoryRemoves the selected category. (Note that the <default> cannot be removed.) Move UpMove up the selected row Move DownMove down the selected row Clear AllClear all data in the table Data Pane Example:
After you specify the main configuration data (previous dialog), proceed to the Data pane. This pane indicates the entities to be included in the BOM and has buttons to manage them.
Move Up and Move DownAllow you to move the selected item up or down. This allows you to determine the order in which items are listed in the BOM. Add/Remove EntityAllows you to add or remove entities (part references and composites) to the BOM. Clicking this button closes the dialog and the system highlights any entities already included. You can use the selection menu on the Conversation Bar to add or remove entities. Clicking Accept on the Conversation Bar then adds or removes the entities from the Data pane. Preview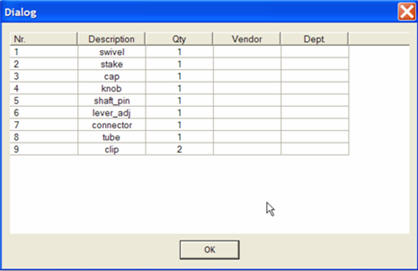
Displays the dialog box shown below. This dialog provides a preview of the BOM tables.
Add V. ObjAllows you to add or remove the available virtual objects. A dialog appears with a list of all available virtual objects so you can select or deselect them, using the standard Windows controls (CTRL or SHIFT). Add BalloonAllows you to add a balloon to the drawing: select the desired row and click this button. The dialog then disappears. The related parts are highlighted. The system prompts you for the arrow position and the text position, and it adds the balloons. HighlightCloses the dialog temporarily and highlights all the elements included in the BOM. Pressing ENTER makes the dialog reappear. Add V. Obj for ItemWhen you select one or more item and click this button, the system automatically generates virtual objects with the same name and data of the selected items. The system adds these to the BOM. You also are able to add new virtual objects, which also are added to the BOM. The dialog that appears is the same as that for the Create Virtual Object function. Output Pane Example: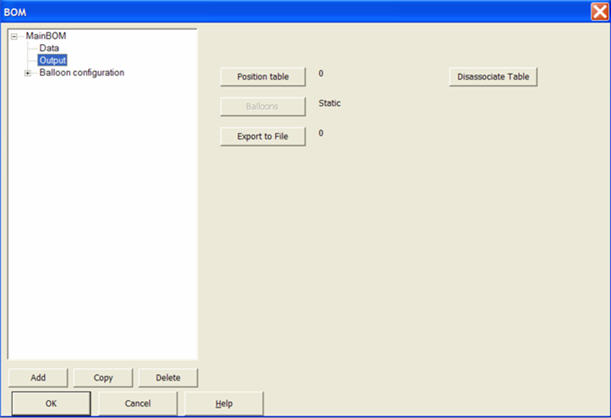
Allows you to create BOM tables (Position Table button), to disassociate a table (Disassociate Table button), or export to a file (Export to File button).
Balloon Configuration Pane Example: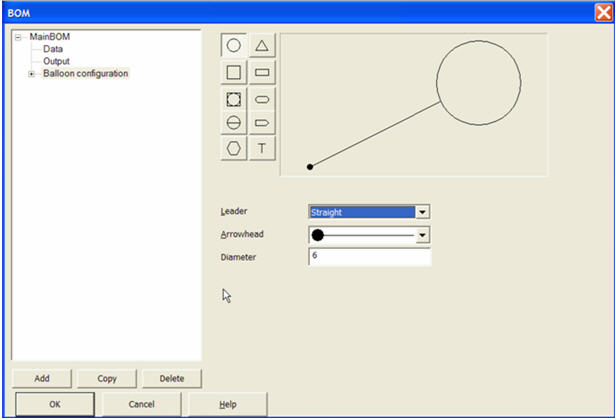
Allows you to define the type of balloon to be used for the BOM.
Note the following:
|