Direct Dimension-driven Editing (DDE)KeyCreator / Modify / Direct Dimension driven Editing (DDE)
This function allows you to alter a solid by changing the value of an attached dimension or adding a dimension to an edge when the edge is cursor highlighted. Using the Function:
Note: Shift key is used to toggle geometry or faces constrained to picked dimension. Alt key is used to toggle dimensions constrained to picked dimension. The Simplest Example: A Block with a Linear Dimension Attached Two things happen during dimension selection:
Notice that the selection is position sensitive: 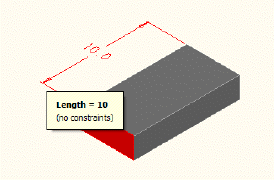 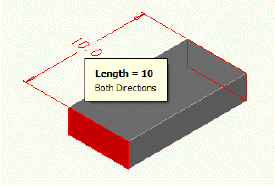 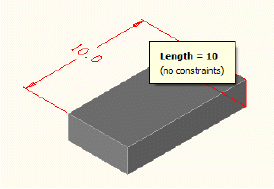
Above are shown three images of the same block with the selection happening at three positions along the dimension. The top image shows the selection on the left of the dimension on the left extension line. The center image shows the selection of the dimension at the text location. The bottom image shows the selection of the dimension along the right extension line. Notice that in the center image both the left and right faces of the model are highlighted and the tooltip shows the text "Both Directions." In the left and right images only one face is highlighted corresponding to the direction chosen on the dimension. What this is indicating is how the model will be modified to satisfy the dimension value change that you specify, by moving the left side, both sides or the right side, respectively.
Select the dimension on the right side and the following Conversation Bar appears: In this simplest situation, you can ignore the Remove button. Notice that the value field shows the current value of the dimension. Here, you enter a new value for the dimension, and thus the geometry that it measures. If you change the value to 20, the following change is made to the model: 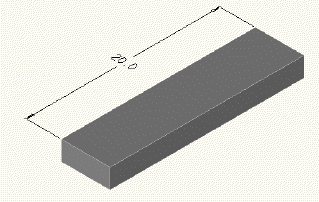
The Add and Remove ButtonsThe Add button on the Conversation Bar is used to move additional faces that are not inferred by the dimension attachment locations. Below on the top is shown the selection of additional faces to be moved. On the bottom is shown the end result of changing the dimension value to 15 and tugging the additional face along in the same direction. 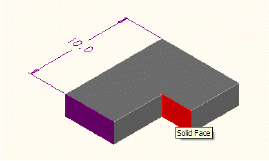 
Likewise the Remove button can be used to take faces out of the set to be modified. Geometric ConstraintsBy default, the searching for Geometric Constraints is disabled. If the SHIFT key is pressed during the selection of a dimension, DDE searches the solid to which a dimension is attached looking for faces that meet two types of geometric criteria: Co-planarity and equal radius. During the selection of a dimension, DDE searches the solid to which a dimension is attached looking for faces that meet two types of geometric criteria: Co-planarity and equal radius. Those faces will automatically be added to the set of faces to change. In the following example there is a face that is coplanar to the one to which the dimension is attached:  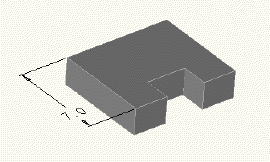
The dimension value was changed to 7 resulting in model shown on the bottom. The other type of geometric constraint is equal radius, which is shown in the next image: 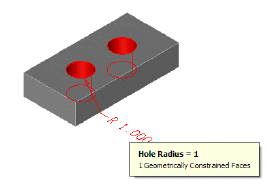 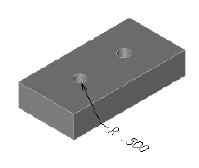
The dimension value was changed to 0.5 resulting in both holes being changed. Dimensional ConstraintsBy default, the searching for Dimensional Constraints is disabled. If the ALT key is pressed during the selection of a dimension, DDE searches for dimensional constraints within the solid to which a dimension is attached. Both linear and angular dimensions have this capability. DDE also searches for dimensional constraints within the solid to which a dimension is attached. Currently, only linear dimensions have this capability. In the example below, the left dimension (value=5.0) is selected on the right side. Because there is another dimension (value=3.0) attached to that face it acts like a constraint, trying to keep its value through the change of the first dimension. Changing the left dimension to 7.0 also causes the rightmost face to be pushed over two units. 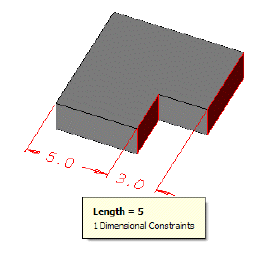 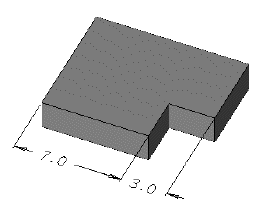
If I Do Not want or Agree with the Geometric Constraints or Dimensional Constraints DDE Finds The way of dealing with incorrect or unwanted selections made by DDE after you select the dimension with the SHIFT and/or ALT key pressed is to use the Remove button to take faces out of the selection. DDE Interaction with BlendsBlends can be edited using DDE: 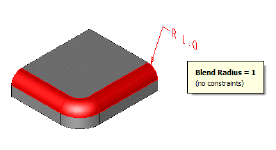 
If blends are "in the way" of a DDE modification, they will be suppressed before and unsuppressed after the desired dimension change is applied. In the case below, the boss with the blend at the base was relocated using DDE. 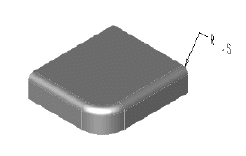 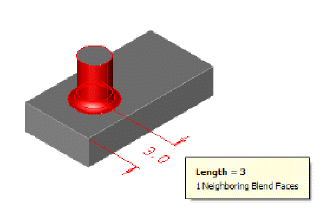
DDE Interaction with Feature HolesDDE can be used to resize or locate feature holes. The changes you make to the feature hole size will be updated in any attached Autolabel as well: 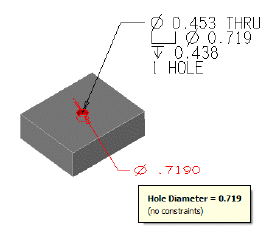 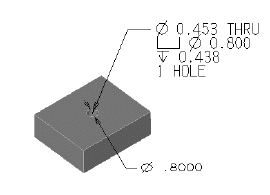
In this case the bore diameter was changed from 0.719 to 0.8.
When a dimension locates a hole such as the example below it is not necessary to add all the faces of the hole. DDE finds them all for you: 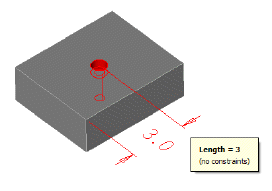
Thirdly, if DDE selects the top face of a blind hole, the blind hole will be tugged in the same direction as the top face. In the example below, the height of the block was increased toward the top. The blind hole which is identified in the tooltip as a "Piercing Hole Face" remains the same length. 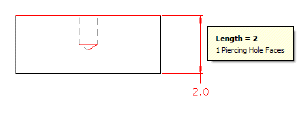 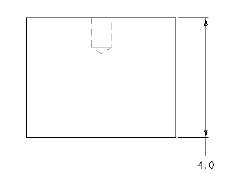
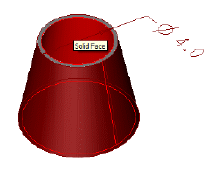
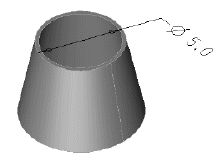
Special Radial/Circular DDE BehaviorsTwo additional behaviors are worth mentioning concerning radial or diametrical dimensions:
Using DDE on Dimensions Between SolidsDDE can be used on dimensions between solids but the "Both Directions" option does not work. You can change the distance of two solids by using the Add button to select all the faces of one of the solids to move. Limitations of DDEIt cannot be used in layout mode. It does not work on wireframe or surface entities. DDE is based on, and therefore has the same limitations as, the following functions:
|

