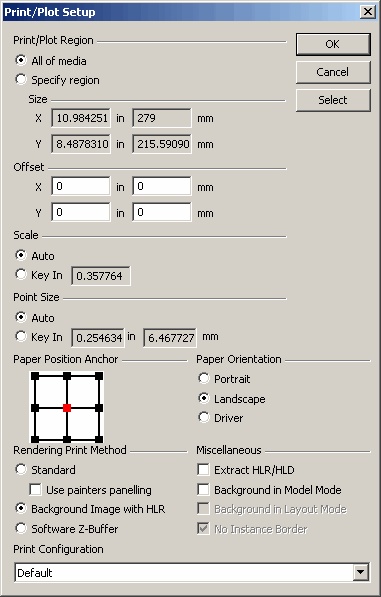
Print/Plot Setup OptionsKeyCreator Drafting / File / Print / Print/Plot Setup OptionsAfter you complete the Print dialog File>Print, and click its Print button, the Print/Plot Setup dialog appears , as shown below.
Dialog Options:
Set the Scale, Anchor, and Map, as well as other print/plot related settings, in this dialog box. Once you have finished configuring the settings in this dialog, click OK to print. Print/Plot RegionThe following settings appear in the Print/Plot Region segment of the Print/Plot Setup dialog. Using these options, you are able to specify the printable region, the size and the offset of that region.
SizeThese options will be grayed out unless you have selected "Specify Region." The Size setting is used to set the size of the printing and plotting region in inches. The maximum size of the print or plot area appears in the Size box when All of Media is enabled. The print or plot region depends on the configuration of your printer or plotter in Windows. Typing in smaller X and Y values, specifies a smaller paper region to use. Specify X and Y values for the printing/plotting region. OffsetSets the origin of the print or plot region to compensate for any default offset the printer or plotter adds. Enter X and Y offset values for the printer or plotter in the Offset box. You can have negative or positive offset values. When entering Offset values, you can enter X and Y values that move the printing and plotting region off the paper resulting in a clipped print or plot. ScaleUse Scale to scale your part to the paper size without distorting the part. Scale determines the ratio of part size to paper size. You can also allow for the scale to be automatically determined, or you can choose your own scale. Point SizeUse to specify the size of a printed point entity. (See the Create>Points drop-down menu for a list of point entities.)
Paper Position Anchor
Paper Position AnchorUse the Paper Position Anchor to define the point from which you move the paper drag box. When you finish setting up the printer in the "Printer Setup" dialog box, you are prompted to indicate a placement for the paper in the viewport. A rectangular highlighted paper border known as a drag box is then displayed. You can move the drag box to any position on your screen. The drag box allows you to set the paper around the part. Drag box boundaries match the print area size you set in the "Printer Setup" dialog box. Position the cursor in the Drag Point box and click on one of the cursor placement options. Paper OrientationSpecify a Portrait (tall) or Landscape (wide) orientation, or select Driver to use the orientation specified in the driver. Printer ConfigurationThis setting allows you to select a printer configuration from the drop-down menu. By default, the "default" configuration appears. Rendering Print MethodUse this option to control how to print in either the Flat or Smooth rendering methods. Three settings are available:
MiscellaneousThe following miscellaneous printing settings are available:
|