KeyCreator Prime / Solid / Add Feature / Shell
Use this function to create a shell, transforming a solid body into a body that represents the walls of the original body with at least one face left open. The Shell feature supports two types of shelling, inward/outward, and multiple offset shelling. Both methods are explained below.
Using the Function:It is possible to shell in both an inward and outward direction at the same time. Note that only positive values can be entered for the shell thickness in the dialog box. To use the Shell feature, follow the steps below. Note that the required steps might change depending upon what settings are chosen in the dialog box for the function.
Dialog Options: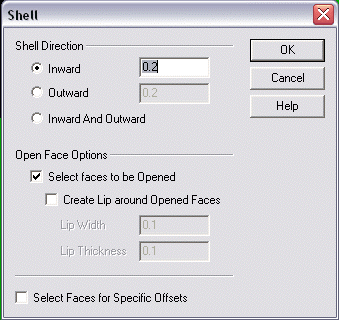
Shell DirectionThe options under Shell Direction allow you to specify a direction for the shell.
Open Face OptionsThese options allow you to specify what faces are to be kept open, and by what lip width and thickness.
Multi-Offset ShellingIndividual faces may have different offset values applied to them, allowing for different wall thickness in the shelled part. This will be enabled when the Select faces for specific offsets checkbox is enabled. You will be prompted to select each face and enter a thickness in the Conversation bar. Inward and outward offsets may be specified for different faces by entering negative and positive values, respectively. When applying different offset values for individual faces, those faces which are smoothly connected to one another (e.g. blended faces), should have the same offset value. This is because the offsetting algorithm will probably fail to re-intersect the offset faces. Faces that join with sharp intersections are good candidates for multi-offset shelling because they will reliably intersect. When specifying specific offset values, you will be prompted to indicate a face, then enter an offset value on the prompt line. A positive value indicates an inward offset, and a negative value indicates an outward offset. Faces are offset the default amount (.2) if they are not specified explicitly in the dialog box. |