Set Filter Dialog OptionsKeyCreator Prime / Home / Editing / Set Filter Dialog OptionsThe settings available from the Set Filter dialog box are explained below. NOTE: You must select the checkbox for an attribute before you can set a mask on that attribute. Entity and attribute Filters allow you to filter a geometric or drafting entity, and/or attribute type for the current operation. For example, if you set a filter on red lines, you are applying a mask on an attribute, red, and a geometric entity, lines. If you set a filter on all labels in a particular part, you are filtering on a drafting entity. Any filter you set using the Set Filter dialog box is in addition to those the selected function automatically sets. Set Filter is most helpful in the following common instances:
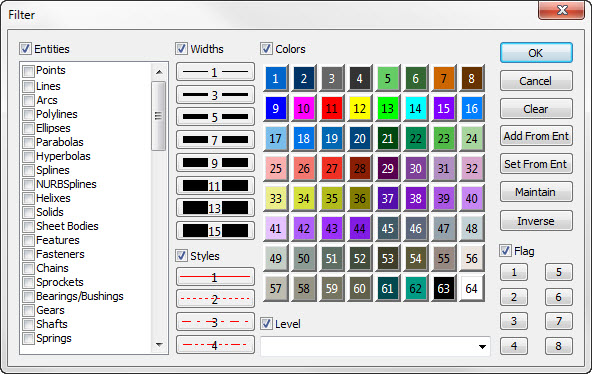
Dialog Options: EntitiesOnce you select this, you are able to specify the entities on which to mask. Note that you can select more than one entity type for the mask procedure, and that you can mask on more than one attribute. You can control the order in which the entities are listed, as explained in Customizing Entity Order. Click OK when done. WidthsOnce selected, select widths, and click OK when done. StylesSelect a line style from the available options. ColorsChoose from any of the 64 allowable colors. Click OK when done. PensOnce selected, select a pen number. Click OK when done. LevelsSelect the Levels checkbox to enable the setting. Once enabled, you are able to mask on entities belonging to a specific Level. You can select the level from the drop-down menu. ADDWhen you click the Add From Ent button, the Conversation Bar prompts you to select the entity with the attributes you wish to add to the mask. This will add those attributes (not including entity type) to the mask, in addition to any mask settings you have already set. This saves you the time of choosing each individual attribute in the dialog box. SETWhen you click the Set From Ent button, the Conversation Bar prompts you to select the entity with the attributes to set for the mask. This saves you the time of choosing each individual attribute in the dialog box. This overrides any previous mask settings. MAINTAINWhen you click the Maintain button, the masking criteria you have selected remains in effect for the current session. Otherwise, the masking criteria only applies to the current operation. INVERSEWhen you click the Inverse button, the current mask is inverted. For example, if the current mask is green and line, the mask allows everything that is not a green line entity. |