|
KeyCreator Prime / Content Menus / Entity Format Context Menu / Context Menu Format Face
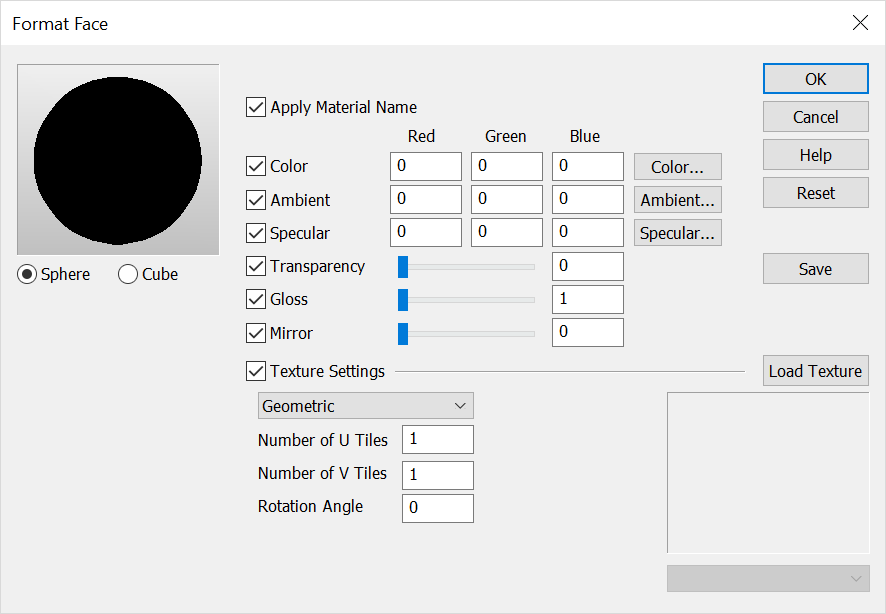
Use this feature to define and apply materials to faces. Materials have multiple properties that can be adjusted to simulate the visual properties of various materials (e.g., glass, metals). Dialog Options:
Changes made to the material updates in the preview window at the upper left corner of this dialog. Sphere and CubeAllows you to see a preview of the selected renderings for a sphere or a cube. Edit MaterialChecked will allow edits to the listed Material Rendering options. ColorDetermines the color, or hue, of the object. AmbientAmbient light is the color that is displayed wherever the face is not lit, and it adds to the color of the face where it is lit. In general, the ambient color should be dark with only a hint of color to represent light that is reflected from other faces. SpecularA Specular light is the light that is reflected when the direction to the eye and the light form equal angles with the surface normal. Specular highlights are the glint that reflects off a smooth surface. In general, the specular color should be close to white with maybe a small hint of the diffuse color. TransparencyThe transparency value determines how much of what is behind the surfaces should bleed through (non-zero transparency values are used for colored glass and transparent plastics). You can use the slider or input a percentage value to determine the transparency properties of the current material. For example, a value of 60 will create a material that is 60% transparent. The range for this value is 0-100%. GlossThe gloss value determines the size of the specular highlight. A small value makes the highlight cover a larger region. Values are usually less than 30 and large values are used to represent hard shiny surfaces such as metals. You can use the slider or input a percentage value to determine the glossiness of the material. The acceptable range for this value is 1-100%. NOTE: A gloss value of 0% will not be accepted. MirrorValue from 1 to 100 (100 max) to specify the reflection of an image of environment map. Texture SettingsTextures may be applied to or removed from either faces of whole solids. Geometric Mapping - Takes the partial derivatives of the face in its parametric center and uses them to scale the mapping so as to stretch the texture equally in both directions. This is the default mapping it is best used to apply a texture to several adjacent faces. Parameter Mapping - Uses the face’s own parameterization to map the texture map. If the parameterization has the same speed in both the U and V directions, then parametric mapping and geometric mapping will be the same. A case where parametric mapping should be used instead of geometric mapping is when a latitude longitude based texture is to be mapped onto a sphere. You can specify the number of tiles to use in both the U and V direction using the appropriate input fields in the dialog; the tiles will be scaled appropriately. A rotation angle for the tile can be entered as well.
Aspect Ratio - Like geometric mapping in that it uses the partial derivatives of the face’s parametric center to stretch the texture equally in both directions. However, in addition to adjusting the U and V stretching based on your input, it also adjusts the scale so as to place one untiled texture onto the face. This option is best to use when mapping portraits or non-square logos onto a single face. The default tile values of 1 and 1 will symmetrically clip the texture in its longest dimension so as to fit on the face. If you do not want the texture to be clipped then it is necessary to set the tile values to the texture width divided by the texture height. Number of U Tiles, Number of V Tiles, Rotation Angle - Use to control the size of the tile itself. A rotation angle for the tile can be entered as well Texture drop-down menu – Select the texture to apply. New ButtonEach material rendering property has a name. When you press the New button, the term "Name" appears in the drop-down under the preview image at the top left of the dialog. Click Name and type the desired name of the new material rendering property. Load ButtonSelect to load an existing material file. Save ButtonClick to save the active material in its current configuration. When this button option is enabled, the name of the material definition currently displayed appears, with a "2" appended to it. To change the name, enter different text in the field. NOTE: More than one material definition files can share the same file name. Load Texture ButtonBrowse for the texture to apply. The following image file types are supported through this function: .BMP, .JPG, .JIF, .DIB, .PCX, .TIF and .TGA. |