KeyCreator / Tools / Machinist / Finish / Morph Finish

This tool path starts from an outer closed boundary and shape, cutting in a spiral path morphing into either a point or inner closed boundary shape. The point or secondary boundary must lie entirely inside the outer boundary but need not be centered or concentric. There must be a containment boundary as part of the selected geometry (defining the outer boundary) and a secondary boundary should be defined as the avoidance (otherwise a prompt for indicate point will appear during tool path processing.)
Using this Function
Below are general steps to complete a Morph Finish tool path. For greater details on any of the steps refer to the KeyMachinistRefManual.pdf .
-
Insure that a tool is defined and loaded or use the Tool dialog after selecting Tools>Machinist>Finish>Morph Finish.
-
A geometry dialog will appear. Insure that you indicate the Containment outer boundary and an Avoidance inner boundary (if left blank you will be prompted for a point.)
-
A Morph Finish dialog will appear when geometry settings are complete. Complete this setup (see below for specifics on dialog) and the path will appear in display for review prior to posting.
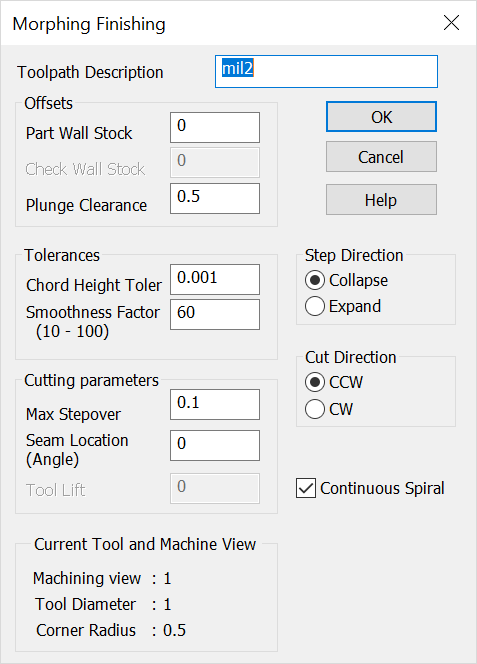
Morph Finish Dialog
Tool Path Description
Enter a descriptive name (optional.) Useful for identifying tool path later in the process. Do not use numeric values in the beginning entry for description name.
Offsets
-
Part Wall Stock – Specify how much stock to leave in 3D.
-
Check Wall Stock – Specify the distance away from the check geometry the cutting tool will remain.
-
Plunge Clearance – Specify a height above the cutting plane at which the Z-Axes will go into feed mode.
Tolerances
Smoothness Factor
Cutting Parameters
-
Max Stepover – Specify a tool X/Ystepover value to be used between the parallel or spiral passes.
-
Seam Location – Specify a cutting angle to be used when Angle is checked under Cut Direction. This is the starting angular value of the tool path measured from the +X axis. Not used when Continuous Spiral is checked on.
-
Tool Lift – Specify a delta Z tool lift value for the end of every pass. Left at a value of 0 the tool contours to next pass (no lifting.)
Step Direction
Cut Direction
-
CCW – When checked, the angle of rotation from the start angle will be counter-clockwise.
-
CW – When checked, the angle of rotation from the start angle will be clockwise.
Continuous Spiral
Uses a helical motion instead of making a closed tool path and then stepping over between cuts.
Current Tool and Machine View
Verify that the machining view, tool diameter, and corner radius are correct.
|