Using the Batch TranslatorKeyCreator / File / Tools / Batch Translator / Using the Batch Translator
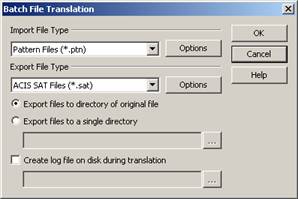
1. Select Batch Translator from the File options. The Batch File Translation dialog box appears, through which you are able to specify the Import File type, Export File type and other options.
2. Select the following options as desired:
For example, if you have your .ckd files in one directory, and want to translate them to IGES files and place them in a different directory, select the Export files to a single directory option. Then, enter a directory name in the field below, or use the browse button to the right and select the directory. If you select Create a log file on disk during translation, the field underneath this option becomes available. This allows you to specify where to locate the log file or do so using the browse button to the right of the field. When this option is enabled, the output from the progress dialog is written to the specified file as the translation is happening. As shown in the example below, the log file indicates when KeyCreator began translating the first file and when it ended translating the last file, along with the total elapsed time. The number of the current files and the total number of files being translated appear before the filename of each input file. The elapsed time appears after the name of each output file.
Example: 3. Select the Import/Export File Types. If options are available for the type(s) selected, the Options button will become active. 4. Click Options to specify the translation options for that type. For details on option settings for each file type search for the files types Option Dialog in Help. 5. Click OK. The Translate Files dialog appears, through which you can specify what file(s) to translate. You can either specify a full directory of files (Select Directory) or specific files (Select Files). If you specify a directory in the top field, you will not need to select the individual files from that directory below. Once you have selected directories and files, you are able to specify additional settings by clicking on the OPTIONS button. 6. Once you have configured the Translate File settings, click OK. The Batch Translator will begin translating files, and a progress indicator will appear. You are able to abort translation at any time by clicking on the ABORT button. |