Using GesturesKeyCreator / Tools / Customize / Using Gestures
A gesture allows you to execute a function by drawing a shape on the Viewport, using a device like a pen on tablet or the mouse button. As illustrated in the steps below, the shape is assigned to the function first on the Commands pane of the Customize dialog. Then, when you draw the assigned shape in the Viewport, the program executes the function, as if you had selected the function from a menu. You must form the shape close enough to the assigned shape. Otherwise, you will get an error message requiring you to try again.
The first example below shows how to use a gesture to execute a function in the Viewport. Though it is easier to draw a shape with a pen, these steps assume you are using a mouse: the right-mouse button is like a hot key for the function.
The second example below shows how to create a new gesture.
For additional details, click Gestures Pane.
Example: Assigning the W Shape to the AutoScale Function
-
Open a CKD file and press CTRL+D as many times as necessary so that geometry extends beyond the borders of the Viewport. This will allow you to see the effect of applying the AutoScale function below.
-
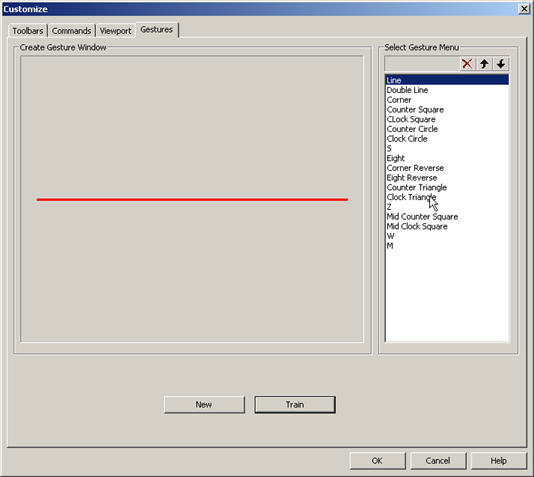
To see how to draw the gesture that you will use in this example, click Tools>Customize and then click the Gestures tab. The Gestures pane appears.
-
In the Select Gesture Menu field, click the W. The selected shape appears in the Create Gesture Window, as shown below. Notice the dot and the arrowhead. The dot indicates the starting point for drawing this shape. So, you will start drawing the W at the top left and end at the top right. Note this, because you need to draw it the same way in the Viewport subsequently.
-
Now that you have seen the shape you will use, click the Commands tab. The pane appears like that shown below.
-
In the Categories field, scroll down to and click View. The View icons appear in the Buttons section.
-
Move the pointer over the icons until the tool tip indicates you are over the AutoScale icon.
-
Click the AutoScale icon. CTRL+A appears in the Current Keys field. This indicates that the hot key CTRL+A was and is assigned to the AutoScale function. That is, when you are in the Viewport, pressing CTRL+A will execute the AutoScale function. Now you are going to assign the supplied W gesture to AutoScale so that drawing a W in the Viewport will be an alternative way to execute the AutoScale function.
-
Click the down arrow beside the Select a gesture field. The list of existing gestures appears.
-
Click W. The Assign Key button becomes available.
-
Click the Assign Key button. The name W appears in the Current Keys field, along with the CTRL+A. This indicates that you can use either the hot key CTRL+A or the gesture W in the Viewport to execute the AutoScale function.
-
Click OK. The Viewport appears.
-
While holding down the SHIFT key, click and hold the right-mouse button and draw the W shape in the Viewport, starting and ending the same way that you noted in step 3. The program executes the function so that the geometry is autoscaled in the Viewport.
Note: In step 11, if you get an error message, you will have to redraw the shape to match more closely the shape you assigned (W). If you keep getting an error message, try training the system: Click the Gestures tab and on the Gestures pane click the Train button. Then try redrawing the shape on the Viewport.
Example: Creating a New Gesture
The previous example uses a W shape, which is one of the supplied gestures (shapes). Instead, you can create your own gesture, as the following steps demonstrate. However, the new gesture must be different enough from an existing gesture, or the software displays an error message. This example creates a lower case g shape as the new gesture, and names this gesture "g".
-
Click Tools>Customize and then click the Gestures tab. The Gestures pane appears, like that shown below.
-
Click the New button. You are prompted to draw the new gesture in the Create Gesture Window.
-
Draw a lower case g in one motion. The Enter new gesture name dialog appears.
-
Type in a lower case g as the name, and click OK. The name "g" is added to the Select Gesture Menu field, and the shape itself appears in the Create Gesture Window, like that shown below. Now you can use this shape to execute the desired function.
|