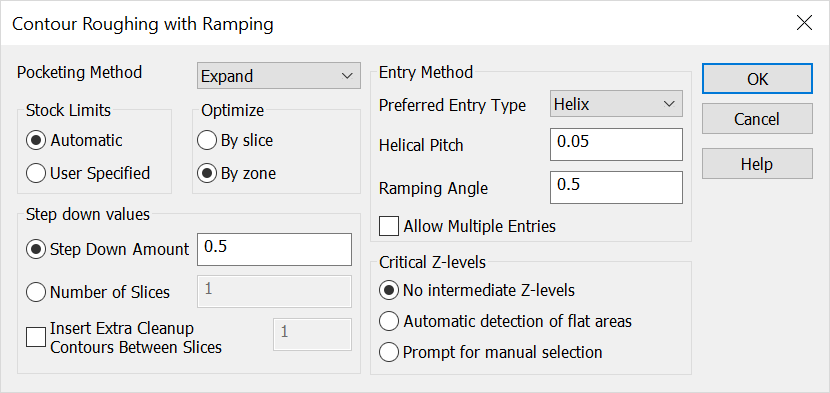
2ND Contour Roughing with Ramping DialogKeyCreator / Tools / Machinist / Rough / 2ND Contour Roughing with Ramping Dialog
This dialog appears when you click OK on the first Contour Roughing and Ramping dialog.

Pocketing Method
Select the pocketing method from the drop-down menu.
-
Expand – When selected, the tool path starts at the center of the cavity and expands towards the boundary, outward. The entry method is determined by the Preferred Entry Type setting.
-
Collapse – When selected, the tool path starts along the boundary and collapses toward the center. Sub-areas are machined in reverse order. If the entry method is set to Helix, the tool will enter the part on the second contour from the boundary, if room exists for such a contour.
-
Core – When selected, the tool first cleans the material and pockets around a core in a collapsing fashion until a complete offset path from the core has been established. Then, the tool collapses towards the core in a set of multiple profiles.
Stock Limits
Step Down By
Step Down Values
-
Step Down – Specify the Delta value used to determine Z steps.
-
Number of Slices – This is the number divided into the distance to machine to determine the Z steps.
-
Insert Extra Cleanup Contours Between Slices – When selected, the number of extra contours specified in the edit field will be inserted between the slabs. This operation is a combination of roughing and semi-contour finishing.
Entry Method
-
Ramping Angle – Specify a value for the ramping angle. This is used for XYZ moves to the Z level to be machined.
-
Allow Multiple Entries – When selected, the tool will lift to the clearance plane, travel to the subarea and re-enter the part according to the Entry Method settings.
Critical Z Levels
-
No Intermediate Z-Levels – Do not factor flats into the tool path.
-
Automatic Detection of Flat Areas – When selected, the software will look for flat areas and produce Z levels at the part wall stock value above the plane.
-
Prompt for Manual Selection – When selected, you will be prompted for specific Z levels requiring tool paths. The part wall stock value will offset the levels that are selected.
|