Bending Methods

KeyCreator / Modify / Warp / Bend / Bending Methods

There are three Bending methods:

Thin Plate Bend:

Thin plate bend is used when the body to be bent can be considered a thin planar plate or sheet metal type object where the top and bottom faces are planar. The body does not actually have to be a solid it may also be a Surface. The only requirement is that the face to be bent is a planar face. Thin plate bending is distinguished from general solid bending because it allows the interaction to be simplified.

  1. Select Thin Plate from the Bend dialog.

  2. Indicate the upper or lower face to be bent (it doesn’t matter which).

  3. Specify the bend axis by choosing from the standard Vector Selection Menu (2 Points, Line, Vector). The Bend axis must be perpendicular to the normal of the face selected.

  4. Select the bend direction vector (up or down).

  5. Select the vector indicating the material side to bend if it’s a fixed-end bend.

KeyCreator Modify Solid Bend method

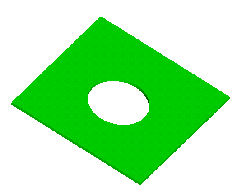
Above > This figure shows a thin plate with a hole prior to bending.

KeyCreator Modify Solid Bend method 2

Above > This figure shows the plate after a 90 degree bend of 1 inch radius.

General Solid Bend:

General solid bend is used when the body to be bent does not represent a thin plate and has curved faces in the bend region. The body does not actually have to be a closed solid it may also be a Surface.

  1. Select General Solid from the Bend dialog.

  2. Select the body to be bent

  3. Select the bend axis plane using the standard Solids Plane Selection Menu (Select, Define). This plane defines a vector, which is perpendicular to the bend axis direction.

  4. Specify the bend axis by choosing from the standard Vector Selection Menu (2 Points, Line, Vector). The bend axis vector must be parallel to bend axis plane.

  5. Select the bend direction vector (up or down).

  6. Select the vector indicating the material side to bend, if it is a fixed end bend.

KeyCreator Modify Solid Bend method 4

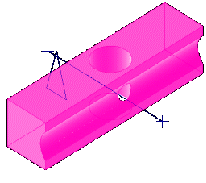
Above > This example shows a solid body prior to bending. The bend axis plane and bend axis line are drawn on the top of the figure.

KeyCreator Modify Solid Bend method 5

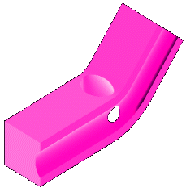
Above > This figure shows the same body bent 45 degrees with a 5 inch bend radius.

NOTE: The bend axis vector must ALWAYS be chosen such that it lies on the neutral axis of the solid to be bent. For instance, in the example above if you choose a bend axis that is 3 inches from the centerline and you enter a bend radius of 2 your bend radius will actually be 5. This is because ACIS assumes that the neutral axis is out that far and it determines that it needs to add the additional 2 inches to provide the correct bend, which in this case is 5.

Wire Bend:

Wire bending allows wires to be bent according to the same rules as solid and sheet bending.

  1. Select Wire from the Bend dialog.

  2. Select the wires using the standard multiple entity Selection Menu. If selecting multiple wires, they must form a valid chain.

  3. Indicate the bending axis position using the standard Position Menu. This position should lie on the selected chain. Wire bending is view dependant, which means that the bending axis is assumed to be a line perpendicular to the currently active view. This simplifies the interaction.

  4. Select the bend direction vector (up or down).

  5. Select the vector indicating the material side to bend if it is a fixed-end bend.